top of page
Router Configuration
WHAT IS IT?
-
Visit the router's IP address (http://192.168.0.1) in a new browser window.
-
We will get the login page.
-
Since we have set a password, I entered a password to get into router setting.
-
If you are log into new router, they have default username and password.
-
Enter that one,

Enter the router IP
Enter router userID & password
Click to login
-
This page will appear after login to the router.
-
Here it allows to changes in a network like from changing the password to make static IP to a host.

Setup a Global IP
-
To set a static (Global/External) IP on the router, open setting > Setup > Internet > Internet Connetion Setup Wizard.
-
Before you begin, you will need to gather all of the following (contact your ISP if you do not have this information):
-
IP Address
-
Subnet Mask
-
Gateway Address
-
Primary DNS Address
-
Secondary DNS Address
-
-
Access the router setup.
-
Click Setup > Internet > Internet Connection Setup Wizard.

-
On the initial Connection Setup Wizard screen, click Next.

-
Set and verify an administrator password.

-
Select a time zone and click Next.

-
On the Configure Your Internet Connection screen, select Static IP Address Connectionand click Next.

-
Enter all of the required information for your Static IP Address Connection and DNS Settings, then click Next.

-
On the Setup Complete! screen, click Connect.

-
On the Reboot Needed screen, choose whether to reboot now or later. Your router must reboot for your new settings to take effect.
Setup a Gateway
-
The default gateway is the same address that we use to access my router settings.
-
And the other computer and devices in the network will have the same gateway address, as they are connected through this gateway.
Setup Primary and Secondary DNS
-
Every router set up with 2 DNS server.
-
DNS means, Internet service that translates domain names into IP addresses.
-
In router setup, go to A
-
Give DNS server address by your choice, we can also use the Google's DNS which is more reliable & efficient.
-
i.e. primary = 8.8.8.8
-
secondary = 8.8.4.4
-
Open router setup.
-
Click on the Manual Internet Connection Setup button at the bottom.

-
Enter the Google DNS addresses in Primary DNS Server and Secondary DNS Server fields.
-
Click Save Settings button at the buttom to take effect.

Set Primary & Secondary DNS
Setup Wifi Network Name & Password
-
To change the Wireless Network name and password, go to router setting > Setup > Wireless Settings > Manual Wireless Connection Setup.
-
Set the Wireless Network name.
-
Set the Security Mode as "WPA-Personal" to make your network password protected.
-
You can create more than one wireless network with different Wireless Network Name with a different password and wireless band (eg. 2.4GHz, 5GHz etc).

Set as WPA
Set a Network name
-
Set a password.
-
Click on Save Setting.
-
The wireless devices need to enter the password to connect to this network.

Set a password
Configuring DHCP Server
-
In our network, this router acts as a DHCP server.
-
DHCP short for Dynamic Host Configuration Protocol, automatically assigns a device-specific IP address to each device on our router's network.
-
It ensures that no two devices will share an IP address and avoids encounter connection errors.
-
In routers setting, we should keep DHCP as enable.
Setup IP Pool
-
Here you can also specify the numbers of total IP addresses that you want to distribute by assigning Starting and Ending IP addresses.
-
As I have assigned 100 to 199, that means 200th devices will not be able to connect to my network.
-
DHCP cannot assign an IP address to host more than its range, as the maximum limit of distributing IP address it set to 199.

Enter the IP range
Setup Lease Time
-
The lease time is set to 10080 minutes by default that literally means 7 days of lease time.
-
That is a DHCP server feature only apply to the device with dynamic IP address.
-
If a device is not a static IP address, then a network user will be allowed to keep connecting to the router for a specified minute (here 7 days) with current DHCP address.
-
To do so, go to router setup > Setup > Network Setting > Change the value in DHCP lease time.
-
To check the lease time of a device connected to our network.
-
Go to router setting, Setup > Network Setting.
-
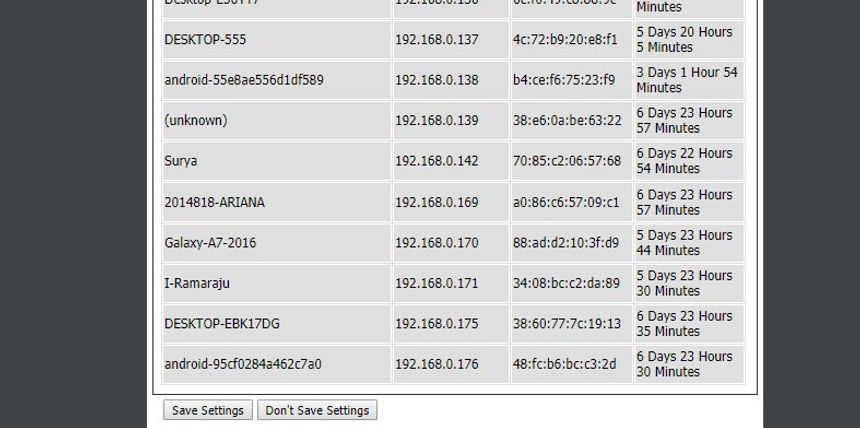
See the Number of Dynamic DHCP clients section.
-
Here is all leases are active at moment after connecting two cellphones to the wifi network with.
-
This table has IP address, MAC address with a lease time of a device.
-
You can see I conneted two Cellphone to the router through wifi, the lease time started.
Bhanu's Cellphone
Birenn's Cellphone
Lease Time
Set Static IP Address
-
We can set a static IP address for any computer or devices.
-
Which I can do by checking the Address Reservation setting on any router setup.
-
Here I am using a D-Link router.
-
On the router, setting click on Setup > Network Setting.
-
To set a permanent IP address to a particular MAC address, put the connected device name or you can put device detail in that field.
-
Click the arrow button to fill the text field.
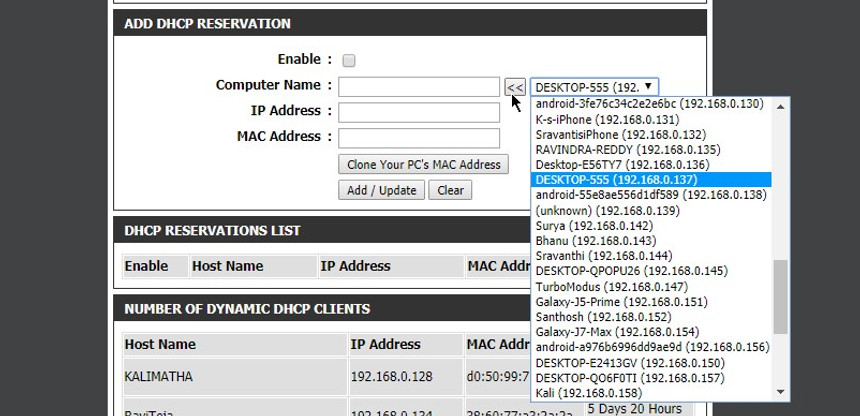
-
After getting filled the detail, click on Add/Update button.
-
You can see the DHCP Reservation List contains one device.
-
If the desktop set the DHCP server enabled, he will get this static IP.
-
And reboot the router to make an effect.

The static IP devices
-
To making this setting permanent, click on Save Setting.

bottom of page